Overview
Updated 06/24/2021
Note: The Background Check feature is no longer supported in versions beyond 14.2. If your site is using a newer version, please use the Background Check Request section.
If your site is setup for creating and submitting background checks, follow the instructions below to create and send background check requests.
To access the Background Check feature, at the Start Page, choose Background Check from the Actions menu (or click the Background Check shortcut button if available).

The Background Check window appears and will display any background checks that have already been requested.
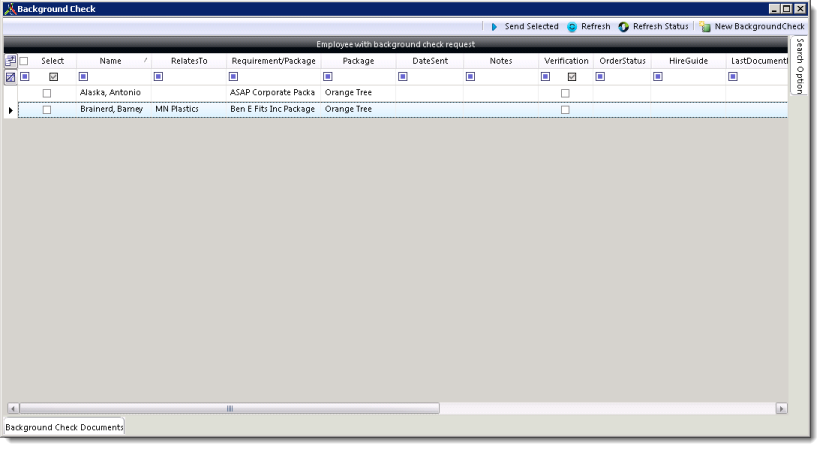
Create a background check
- Click the New Background Check button in the upper-right portion of the window. The New Employee Background Check window appears.

- From the Employee drop-down list, select the employee for which you are sending a background request. Enter a full or partial last name and press the Enter key to see the list of matching employees.
- From the Requirement/Package drop-down list, select the type of check you are requesting based on the packages available through the provider.
- If the background check is related to a customer, choose Is Customer, or if related to the supplier, choose Is Supplier.
- From the Supplier Name/Customer Name drop-down, select the appropriate name. Enter a full or partial last name and press the Enter key to see the list of matches.
- If you are ready to submit the background request at this time, click Send Now. Otherwise, you can submit the request from the main Background Check window at any time.
- Enter any additional information about the request in the Notes text box.
- Only select the Send Now checkbox if the request needs immediate attention (once you click Finish, the background check request is submitted). The background check request appears in the list of background checks in the main Background Check window.
Search for background checks
The search options allow you to display a particular set of background checks. A date range can be set, and the order status and verification option can be specified.
- In the Sent Between drop-downs, select the beginning and end dates to indicate the date range of background checks to display.
- In the Order Status option, click one of the following:
- Completed: Only displays background checks that have been completed.
- Incomplete: Only displays background checks that are not yet complete.
- Both: Displays both complete and incomplete background checks.

- In the Verification Option group, click one of the following:
- Verified: Display those checks that have passed.
- Unverified: Display those checks that have not yet passed.
- Both: Displays both verified and unverified background checks.
- Verified: Display those checks that have passed.
- Click Search to display the background checks in the Background Check list that match the search options specified.
Order background checks
- Select the background check(s) to send by clicking the checkbox for each check to submit.
- Click the Send Selected button in the upper-right corner of the window to submit the orders. The Date Sent value is updated based on this transmission date.
Note: When the background check requests are sent, a verification of each employee's Social Security Number is performed to ensure the employee's SSN is valid. If the SSN verification fails, the background check for that employee is not conducted. Invalid SSNs need to be resolved prior to any further requests for those employees.
View background request errors
If any errors are encountered during the submission or processing of background check, these errors are available for viewing in the Background Check section. Any background check requests with errors will display a red indicator icon, as shown below.

- To view more information about an error, double-click the indicator icon or click the Errors tab in the upper-left portion of the window. The Background Check Errors window appears.

- Review the errors and make corrections as needed.
- Send the requests again and confirm that the errors have been resolved.
Request background check documents (Orange Tree)
If the background check provider is Orange Tree, the following steps explain how to request the results of the background check.
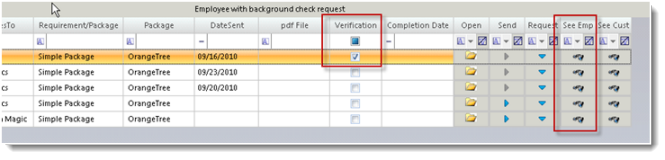
- Once the background check provider indicates that the check is complete, the documents and online results for the background check can be requested. If needed scroll the list to the right to bring the buttons on the far right into view.

- Click the Document Request button. The document is downloaded and online results are made available.
- To view the document, click the Background Check Documents tab found in the lower left portion of the window, or to view online results, click the View Result button.
View background check PDF documents (Orange Tree)
- To view the returned PDF documents from Orange Tree, click the Background Check Documents tab in the lower-left portion of the window. Results of the background check will be loaded as a .pdf file. Though all users who have access to request a background check can see when results have been returned, viewing of the file can be restricted by your administrator.
- Click the PDF document's Open button to view the document in PDF format, or click the Open button associated with the link to log in to the provider and view the document on the provider's website.
View results via provider's website
- Once the background check provider indicates that the check is complete, the documents for the background check can be requested. If needed scroll the list to the right to bring the buttons on the far right into view.
Note: If you are viewing Orange Tree online results, you must click the Document Request button first to make the results available.

- Click the View Results button.
Note:The View Results buttons are enabled only when there are results ready for viewing.
The results are displayed in your browser via the provider's link to the results on their website. - Log into the site with the Username and Password supplied to you by the provider to view the results.
Record results in employee record
Once completed results have been reported in the Employee section's Employee Screening subsection, the Requirement's tab can be updated to reflect the status.
- Go to the employee's record by clicking on See Employee button in Background Check section or by searching for the employee in the Employee section.
- Click Requirements in the Employee submenu.

- Select the background check package used in the Type column.
- Tab through, a checkmark indicates a pass result. To indicate an issue, uncheck the box. The requirement has now been recorded. In the Background Check window (Start Page > Background Check), the Verification box for that employee and background check will appear as checked.
Background check configuration
For additional configuration specific to one of the following providers, click a link below:
- Orange Tree
Grant user permissions
Follow the steps below to grant permissions for users to have access to the Background Check feature in Avionté.
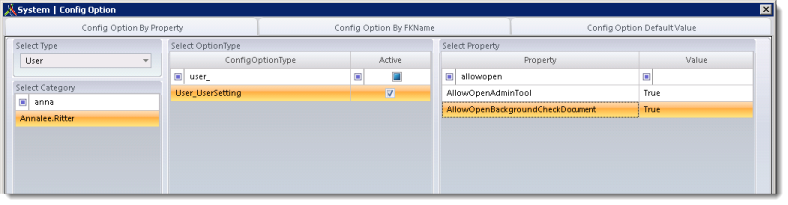
- In Admin Tools, select System and then double-click Config Option. The Config Option window appears.
- Select either the type of User or Group from the Select Type drop-down.
- Select a group or user, then in the Select Option Type column, find usr_act_BackgroundCheck and make sure the Active checkbox is checked. This grants permissions for users to have access to the Background Check feature. If the box is unchecked, the user(s) will not have access.

- Find and select User_UserSetting in the ConfigOptionType column.
- In the Select Property column, find the AllowOpenBackgroundCheckDocument property and set to True. If the property is False, the user will not have access to the background check reports. This property provides users access to open PDF documents available through Orange Tree.
- Repeat the above steps as necessary for any other users or groups that need permissions.
Comments
0 commentsPlease sign in to leave a comment.